Countertop Paint & DIY Coating Kits


About Countertop Paint & DIY Coating Kits - Walmart.com
Countertop paint helps you refresh laminate, wood, and tile surfaces without replacing the whole counter. You can compare material fit, finish, and kit contents to plan a cleaner DIY update.
If you're updating a kitchen or bathroom, you need guidance that matches your countertop material. You can use this page to compare countertop paint options for laminate, wood, tile, and stone-look results.
Choosing countertop paint for your material
Your surface material should guide your first decision. You should check whether you're painting laminate, wood, tile, or granite-look surfaces before choosing a formula.
For laminate countertop paint, you should look for strong adhesion and a smooth leveling finish. You want coverage that helps you update slick, factory-made surfaces with fewer visible brush marks.
If you have wood counters, you should consider how grain may show through the coating. You may prefer products that help you build an even color before adding a protective top layer.
Tile counters need a coating that can settle over grout lines and varied surfaces. You should measure how much texture you're willing to keep before you choose your finish.
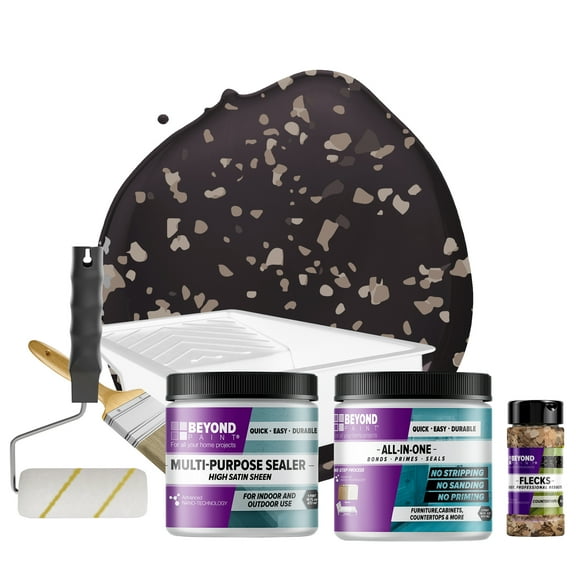
If you're after a stone-inspired result, you can compare granite look countertop paint with solid-color options. You may prefer multi-step systems that help you create speckled or layered visual depth.
How to compare countertop paint kit options
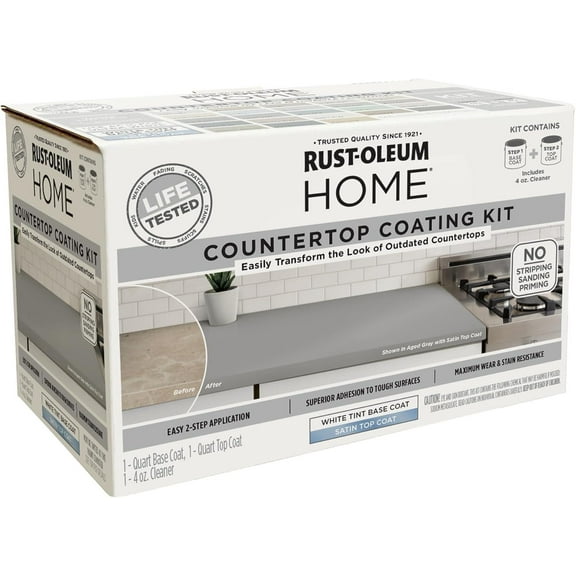
A countertop paint kit can simplify your project when you want coordinated steps. You should check whether your kit includes cleaner, primer, color coat, rollers, and top coat.
If you already have supplies, you may prefer an individual paint can or a top coat only. You can compare included tools against your project size to avoid mismatched quantities.
- You can use complete kits when you want one guided system for prep, color, and protection.
- You can choose single cans when you already have compatible primers, rollers, or sealers.
- You should check coverage per container so your countertop size matches the amount included.
- You can compare included applicators if you want fewer separate purchases before starting.
Kit completeness matters because missing steps can slow your project. You should confirm whether your system includes both the color layer and the final clear coat.
Comparing epoxy countertop paint and other bases
Paint type affects how your finish applies and cures. You should compare epoxy countertop paint, acrylic formulas, water-based options, and oil-based coatings by surface and project pace.
Epoxy systems usually matter when you want a hard shell-style finish over heavily used counters. You can think of epoxy adhesion as stronger bonding for slick surfaces and busy prep areas.
Acrylic and water-based products can be easier for many DIY updates. You may like their simpler cleanup and steadier application when you're working in smaller indoor spaces.
Oil-based coatings can offer a different flow and finish appearance. You should check dry times and application steps carefully if you want a smoother process from start to finish.
Your choice should also reflect how much prep you're willing to do. You may need sanding, cleaning, or a bonding layer depending on your current countertop surface.
Choosing finish, color, and everyday performance
Your finish changes how the countertop looks in natural and overhead light. You can compare gloss, semi-gloss, satin, matte, and stone-look styles based on your room's design.
Gloss and semi-gloss finishes can reflect more light and look sleek in compact kitchens. Satin and matte options can soften the look if you want a quieter surface appearance.
You should also think about everyday cleanup before choosing a finish. Your top coat and sheen can influence how easily you wipe spills and crumbs from the surface.
For countertop refinishing, you may also compare how systems handle water spots, common stains, and routine use. You want a finish that supports daily cooking spaces and repeated wiping.
If your project includes a kitchen countertop paint update, you should check heat guidance and top-coat directions. You can use those details to match the coating to your cooking habits.
Understanding drying and curing times
Drying time and curing time aren't the same, and you should plan for both. You may touch a dry surface sooner, but you should allow full cure time before regular countertop use.
Some coatings dry within hours between coats, while full curing can take several days. You should read each label so your project timeline matches your household routine.
If you need to use the room quickly, you should compare multi-day cure schedules before buying. You can avoid frustration when you know how long the surface needs before normal use.
Ventilation and room temperature can also affect how your coating sets. You should check application instructions so your finish has the right conditions during each step.
Matching countertop paint to real home projects
If you're covering dated laminate in a kitchen, you may start with laminate countertop paint or a complete kit. You can get a coordinated process that fits a straightforward surface refresh.
For an older bathroom vanity top, you may want a compact refinishing system with cleaner, color, and top coat. You should compare smaller coverage amounts if your counter footprint is limited.
If you're updating tile counters, you should look closely at texture and finish expectations. You can choose products that help you coat both tile faces and grout lines with a more unified look.
When you want a stone-inspired upgrade, you may compare granite look countertop paint with layered systems. You can create a decorative surface effect without changing the countertop structure.
If your space handles frequent meal prep, you should compare top coats, cure schedules, and finish durability. You can narrow your options by balancing appearance, drying time, and protective layers.
With the right countertop paint plan, you can match the coating to your material, finish goals, and project timeline. You end up with a refreshed surface that looks more current and feels ready for daily use.